How to Make Your First Sourdough Loaf (A Simple, Step-by-Step Guide That Actually Works)
Beginner sourdough, made simple
How to Make Your First Sourdough Loaf (Step-by-Step)
A practical, beginner-friendly guide to baking real sourdough at home — from mixing and fermentation to shaping, cold proofing, and baking a beautifully risen loaf using traditional methods that support digestion and blood sugar.

Author
Craig McCloskey
Certified Nutritionist

If you’ve been curious about sourdough but felt intimidated by complicated recipes, conflicting timelines, or bread that just never turns out right—you’re not alone. Sourdough can feel mysterious at first, but when you break it down into simple, repeatable steps, it becomes one of the most approachable and rewarding foods you can make at home.
In this guide, I’m walking you through exactly how we make our sourdough at home—from starter to finished loaf—using a process that’s beginner-friendly, flexible, and rooted in traditional fermentation. This article stands on its own, but it also pairs with the full video tutorial where you can see every step in real time.
Sourdough isn’t just about flavor. When prepared properly, it’s also easier to digest, lower on the glycemic response, and closer to how grains were consumed for most of human history.
And if you missed our previous video walking you through how to make your very first sourdough starter from scratch, check it out here!
Let’s get into it.
Why Sourdough Is Different From Regular Bread
Most modern bread is made with commercial yeast and rushed through fermentation in a matter of hours. That speed comes at a cost. Short fermentation leaves behind more gluten, phytic acid, and other compounds that can irritate digestion and interfere with mineral absorption.
Sourdough relies on wild yeast and lactic acid bacteria instead. These microbes ferment the dough slowly, breaking down gluten proteins and reducing anti-nutrients over time.
This slower process isn’t a trend—it’s how bread was made for thousands of years.
“The benefit of sourdough isn’t just the ingredients — it’s the time. Long, slow fermentation is what transforms flour into something the body can actually handle.”
The Few Tools You Actually Need
You don’t need a professional kitchen to make sourdough, but a few tools make the process smoother and more consistent.
An active sourdough starter is the foundation. If your starter isn’t bubbly and lively, your bread won’t rise properly. (We have a separate starter tutorial if you’re brand new.)
A kitchen scale is non-negotiable. Sourdough relies on ratios, not volume, and weighing ingredients ensures consistent hydration and structure.
You’ll also need filtered water, an organic unbleached flour, and a high-quality mineral-rich salt (we use Redmond-style real salt). A Dutch oven, proofing basket, and chlorine-free parchment paper help create the crust and rise sourdough is known for.
These are all tools you’ll use over and over again, and they’re worth having on hand.
SHOP OUR SOURDOUGH ESSENTIALS
Everything We Use — In One Place
Shop the exact products we use to make a perfect sourdough loaf
 Weck Jar
Starter Jar
The glass Weck jars we use to keep our sourdough starter in.
Shop Amazon → Sourdough Stick
Wood Spurtle
Perfect for scraping the sides and mixing your starter.
Shop Amazon → Starter
Dehydrated Starter
Makes beginning your sourdough journey effortless.
Shop Amazon → Scale
Scale
Kitchen Scale
Essential tool for getting portions exact.
Shop Amazon → All-Purpose Flour
King Arthur Flour
Organic, unbleached all-purpose flour.
Shop Amazon → Water
Water
AquaTru Reverse Osmosis Filter
For perfectly filtered water, every time.
Shop AquaTru → Salt
Salt
Redmond's Real Salt
High-quality salt, with perfect flavor.
Shop Amazon → Dutch Oven
Lodge Dutch Oven
5 Quart Cast Iron Double Dutch Oven – Pre-Seasoned. PFAS-Free. Durable & Non-Toxic.
Shop Amazon → Basics
Sourdough Basic Essentials
Get started with this sourdough essentials kit.
Shop Amazon → Parchment
Unbleached Parchment Paper
Non-Stick, Non-Toxic Cooking Paper.
Shop Amazon →Step One: Mixing the Dough
The process starts with water. Measure 325 grams of filtered water into a bowl. To check if your starter is ready, drop a small amount into the water. If it floats, that’s a sign it’s active and producing enough gas to leaven the bread.
Add 100 grams of starter to the water and mix until it looks cloudy and uniform. This creates your wet base.
In a separate bowl, combine 475 grams of organic unbleached flour with 10 grams of salt. Slowly pour the wet ingredients into the dry, mixing gently until everything is incorporated. At this stage, the dough will look shaggy and uneven—that’s exactly what you want.
Cover the bowl with a damp towel and let it rest for about 30 minutes. This rest period allows the flour to fully hydrate and begins gluten development without aggressive mixing.
Stretch and Folds: Building Structure Without Overworking
After the rest, you’ll begin a series of stretch and folds. With slightly wet hands, lift one side of the dough, stretch it upward, and fold it over itself. Rotate the bowl and repeat until you’ve completed four folds.
This gentle technique strengthens the dough, traps air pockets, and distributes temperature evenly. You’ll repeat this process every 15–20 minutes for about an hour total.
Unlike kneading, stretch and folds preserve the dough’s integrity while encouraging elasticity and rise.
Once complete, cover the dough and let it bulk ferment at room temperature for 6–8 hours, or until it has roughly doubled in size.
Shaping the Loaf
When bulk fermentation is complete, lightly flour a work surface and gently turn out the dough. Flatten it into a rough rectangle, then fold it into thirds lengthwise. Roll it into a tight ball, using gentle push-and-pull motions to create surface tension.
This shaping step helps create structure and those beautiful internal air pockets once baked. Don’t worry if it’s not perfect—this improves with practice.
Place the dough seam-side up into a floured proofing basket, cover it, and transfer it to the refrigerator.
Why Cold Fermentation Matters
This is where sourdough really becomes sourdough.
Cold fermentation slows yeast activity while allowing beneficial bacteria to continue working. Over 48–60 hours, this process further reduces gluten and anti-nutrients while enhancing flavor, texture, and digestibility.
This extended fermentation is one of the reasons traditionally prepared bread feels different in the body.
“Properly fermented sourdough tends to have a lower glycemic impact and reduced anti-nutrients compared to modern bread — which is why many people tolerate it better.”
▶ Watch the Full Sourdough Tutorial
Read the video transcript
[0:00] What's up, guys? Many of you have been asking for a little while now for a easy step-by-step tutorial on how to make your first sourdough loaf.
[0:05] Well, I got a special treat for you today because we are going to be doing just that.
[0:10] But I had to bring a special guest with me today. This is my wife Bethany.
[0:14] Bethany: Hi, guys.
[0:15] She is more of a sourdough expert than I am. So, we are going to be working together today to bring to you a very easy sourdough tutorial.
[0:21] I'll explain all the tools you'll need, the step-by-step instructions. So, when you're ready, let's make some sourdough.
[0:40] So, going over the tools you'll need, you'll need just a few simple things to get your sourdough journey started.
[0:45] The very first thing you'll need is a very active and bubbly sourdough starter.
[0:49] We did a part one video on how to get your sourdough starter active, how to start it, all the benefits of it. So, if you haven't seen that, go check out that last video.
[0:58] But this is the very first thing that you'll need.
[1:00] You'll also need a kitchen scale. This is absolutely essential. You'll need this to weigh out all of your ingredients.
[1:05] You also need some filtered water and a high quality all-purpose organic unbleached flour.
[1:10] You're also going to need some salt. We're fans of Redmond's real salt.
[1:13] You're going to need two large mixing bowls, a dough mixer, wet towel. You'll see why in a little bit.
[1:19] You're going to need a proofing basket, a score, Dutch oven.
[1:21] We have a cast iron Dutch oven that we can use, but any Dutch oven will work.
[1:24] And some parchment paper, preferably unbleached and chlorine-free parchment paper.
[1:28] I'll be sure to put all of this in the description below, the tools, the ratios, and all the instructions in the description below.
[1:35] All right, so now that you have all of your tools laid out, are you ready? Let's get started.
[1:39] So, the first thing that we're going to start with is we are going to add 325 g of our filtered water into a mixing bowl.
[1:48] We're trying to keep it pretty exact.
[1:50] So, we got 325 g of filtered water. And now what you want to do, and this is called the float test.
[1:57] So, what you're going to do is you're going to add just a little bit of your active bubbly starter.
[2:00] And what it should do, it should float on top of the water.
[2:04] And that is a good test to show if your starter is actually active.
[2:08] And so, as you can see here, our starter is floating on top of the water.
[2:12] So, what this test shows is that your starter has enough carbon dioxide in it that can actually help to lift your bread when you're baking it.
[2:18] So now you're going to add a total of 100 grams of your starter to your water. These are your wet ingredients.
[2:23] And so you're just combining these two.
[2:27] And when we have 100 grams of starter measured out, then we're kind of going to mix it all together and make it like a a milky consistency almost.
[2:33] So now with clean hands, she's going to go in and just kind of mix it together and get that mixed evenly.
[2:42] All right. So now you have your wet ingredients. We're going to set those aside for a minute.
[2:46] Grab your larger mixing bowl and start with our dry ingredients.
[2:48] And then you're going to add 475 gram of flour. This is organic unbleached all-purpose flour.
[2:55] We'd like to experiment sometimes with einkorn. That's something that we'll make future videos on in the future, so make sure you're subscribed if you aren't already.
[3:02] But right now she's measuring out 475 g of this flour.
[3:07] There's different recipes out there, but this is just one recipe that we're using today.
[3:10] And then with that, she's also going to add in 10 g of our favorite sea salt here.
[3:15] So now it's time to combine the wet with the dry ingredients.
[3:17] So you're just going to do this slowly. As I pour about half of this in there, she's going to mix it together.
[3:25] And once all these are mixed together, she's using the dough mixer to kind of mix all this up.
[3:29] You're going to notice that it's going to be a stringy consistency. It's not going to be very well-formed. It's going to be stringy. It's going to kind of be clumpy, but that's okay.
[3:37] Your dough will actually form. Once we do more of our proofing, we'll do some of our stretch and folds in a little bit.
[3:45] You'll notice that this will really start to come together and rise and actually look like a loaf of bread.
[3:47] It's important that you don't want to overmix this either.
[3:51] You want to make sure it's just mixed enough that all the ingredients are thoroughly mixed together, but not too much to where you kind of overmix it.
[3:59] Right now, you're just going to cover your dough with a damp cloth and let it sit for 30 minutes.
[4:02] Ideally, in a temperature that's a little bit warmer, maybe 70 to 80°.
[4:07] And you're going to let that sit for 30 minutes because the water needs time to hydrate the flour.
[4:11] So, we're going to come back in 30 minutes and go from there.
[4:15] If the inside of your house isn't warm enough at this point, you can set it outside if it's appropriate temperature.
[4:18] Make sure it's not too hot or it can really blow up. But 70 to 80° is ideal.
[4:22] And during this 30 minutes would be a nice time to refeed your starter.
[4:26] And if you haven't checked out that part one video where we talked about how to feed your starter, check that out now.
[4:30] So, now it's been 30 minutes and we've allowed our ingredients to come together. Now, we're going to do what's called stretch and folds.
[4:36] And it's exactly as the name implies. We are going to stretch it and fold it over.
[4:43] So this probably works a little bit better with damp hands.
[4:49] So really all you're going to do is pick it up, stretch it out, let it fall, and then just fold it over.
[4:57] And you're just going to quarter turn this and do it again.
[5:05] And you're going to do this four times.
[5:06] And why you want to do this series of stretch and folds is because it helps to strengthen the dough, but it also helps to get an even temperature throughout the dough.
[5:15] And it also traps little air pockets inside, which when we let this proof for the next 6 to 8 hours, that's when the magic happens.
[5:24] That's when it starts to blow up and actually look like a sourdough loaf.
[5:27] So now we're just going to cover it back up with a damp cloth and let sit for 15 to 20 minutes.
[5:31] And you're just going to repeat that process three or four more times.
[5:34] All right. So, it's been about 1 hour. We've done our four rounds of stretch and folds.
[5:39] Now, we're going to cover it with a plate. Let it sit in bulk ferment for about 6 to 8 hours or until it doubles in size.
[5:48] All right, it's now been 8 hours and our bulk ferment is now complete.
[5:55] It's basically doubled, maybe even tripled in size.
[5:57] So, now we're going to transition our what is going to be our loaf to the proofing basket.
[6:03] But first, we're going to start off by putting down a cutting board and just laying down a bed of flour. This will help keep it from sticking.
[6:13] So, what she's going to do here is she's going to really flatten this out into almost like a rectangle and get this pretty thin.
[6:22] Now she's going to fold this into thirds, hot dog style, long ways.
[6:26] And then she's going to roll it from the ends and just kind of roll it up into a ball.
[6:32] And then after she rolls this into a ball, she's going to do a little bit of push and pull motions.
[6:37] This really helps to form the dough, create those nice air pockets, and form what's going to be our sourdough loaf.
[6:45] Some people like to call this bend and snaps, which is a shout out to Legally Blonde.
[6:50] This might take a little bit of practice. The more you do this, you might not be perfect the first time you do it.
[6:56] But this will just come the more you practice it, like anything.
[6:59] You want to do this about 5 to 10 times through until you get a nice formed ball of dough.
[7:03] So now we're going to transition this to a pre-floured proofing basket.
[7:11] And then we're going to cover this and we're going to put this in the fridge anywhere from 2 hours up to maybe 72 hours.
[7:17] We found the sweet spot is right around 48 to 60 hours in our fridge.
[7:24] Sitting it in the fridge at a nice cool temperature keeps it from rising drastically.
[7:35] But putting this in the fridge, it's going to allow it to still ferment but at a much slower pace.
[7:38] This step here is really where the magic is going to happen.
[7:45] This is really what gives sourdough its unique benefits.
[7:50] Some of those benefits, like we talked about in the first video, are reducing the glycemic load.
[7:55] So, you can eat this and it's probably not going to spike your blood sugar as much.
[7:58] It's also going to reduce the gluten content and some of the other anti-nutrients commonly found in grains.
[8:03] This is something that our ancestors have been doing for a very, very long time.
[8:07] There was even a recent randomized control trial that compared three different types of bread in individuals with celiac disease.
[8:14] Ultimately what the researchers found is that when they consumed properly long fermented sourdough that was fermented for 48 hours, it didn't trigger any symptoms and their gut lining was still intact.
[8:31] That really speaks to what traditional preparation methods like soaking, sprouting, and fermenting can do.
[8:38] We highly encourage you to trial out what feels best for you, whether it be the two up to 72 hours.
[8:43] Sometimes we've found that if you wait till the 72, it tends to fall a little bit more and not be as voluminous.
[8:50] So definitely experiment with the timing that works best for you.
[8:53] See how your gut feels. And that's going to give you the key answer to how long to let it proof in the fridge for.
[8:58] So now we're going to stick ours in the fridge and we'll see you back here in about 48 hours.
[9:01] What's up, guys? Real quick, if you are loving this content, then you are absolutely going to love this new Ancestral Protein Powder by Ancestral Supplements.
[9:10] This is 100% grass-fed and grass-finish protein powder… a beef bone broth protein isolate combined with organs and medicinal mushrooms… sweetened with monk fruit.
[9:23] Everything's been third-party lab tested… preservative free… and there's definitely no seed oils in this protein powder at all.
[9:36] What makes it unique is it combines many different organs like liver, heart, pancreas, kidney, and spleen along with bone matrix—and medicinal mushrooms.
[9:51] These medicinal mushrooms include lion's mane… chaga… cordyceps… and reishi.
[10:03] These mushrooms are grown right here in the United States… regenerative organic certified.
[10:15] This is a complete protein that's going to support your gut health, immune system, metabolism, and muscle growth.
[10:24] It comes in both vanilla and chocolate. So, get your hands on some today.
[10:29] All right, guys. It's been 48 hours and our sourdough has been fermenting in the fridge this entire time. Now, it's time to bake.
[10:35] Our cast iron Dutch oven has been preheating in the oven for an hour at 450°.
[10:40] Now, we're going to turn it down to 425 and get ready to bake.
[10:43] So, now it's time to score our sourdough loaf.
[10:47] You want to do this fairly quickly because as soon as you put the sourdough on the parchment paper, it's going to start to flatten just a little bit.
[10:53] Scoring is essentially what gives that sourdough that pretty and majestic look.
[11:01] She's going to take a little knife and just create little designs in it.
[11:06] You can get really fancy with this, but we keep it fairly simple.
[11:08] This helps the bread to rise and just makes it look overall really nice.
[11:13] And she's going to use chlorine-free parchment paper and stick this in the oven.
[11:18] Now we're going to put the lid on and stick this in the oven for 25 minutes.
[11:30] After it's been baking for 25 minutes, then you're going to reach in and take the lid off and bake for an additional 15 minutes or until it turns golden brown.
[11:43] All right, guys. That's how you bake sourdough.
[11:46] We took it out of the oven and typically you'd let it rest for about an hour before you cut into it.
[11:51] So, we are going to remove it from the cast iron, sit it here on our cutting board, and then we are going to use a bread knife.
[11:58] There's a few different kinds, but we're going to use our bread knife here.
[12:01] And then you just cut nice, nice chunks.
[12:08] As you can see, it's a beautiful loaf of sourdough.
[12:11] You can grab your favorite toppings. We like butter, sometimes jam. Just really depends. And enjoy.
[12:19] Cheers.
[12:26] That's really good.
This is where you can see each step—from mixing to scoring—exactly how we do it at home.
Baking the Bread
Preheat your Dutch oven in the oven at 450°F for one hour. Once heated, reduce the oven temperature to 425°F.
Remove the dough from the fridge, place it on parchment paper, and score the top with a sharp blade. Scoring allows the loaf to expand properly in the oven and gives sourdough its signature look.
Carefully place the dough into the hot Dutch oven, cover with the lid, and bake for 25 minutes. Then remove the lid and bake for an additional 15 minutes, until the crust is deeply golden.
Let the loaf rest for at least an hour before slicing. Cutting too early releases steam and can compromise the crumb.
The Result (And How to Enjoy It)
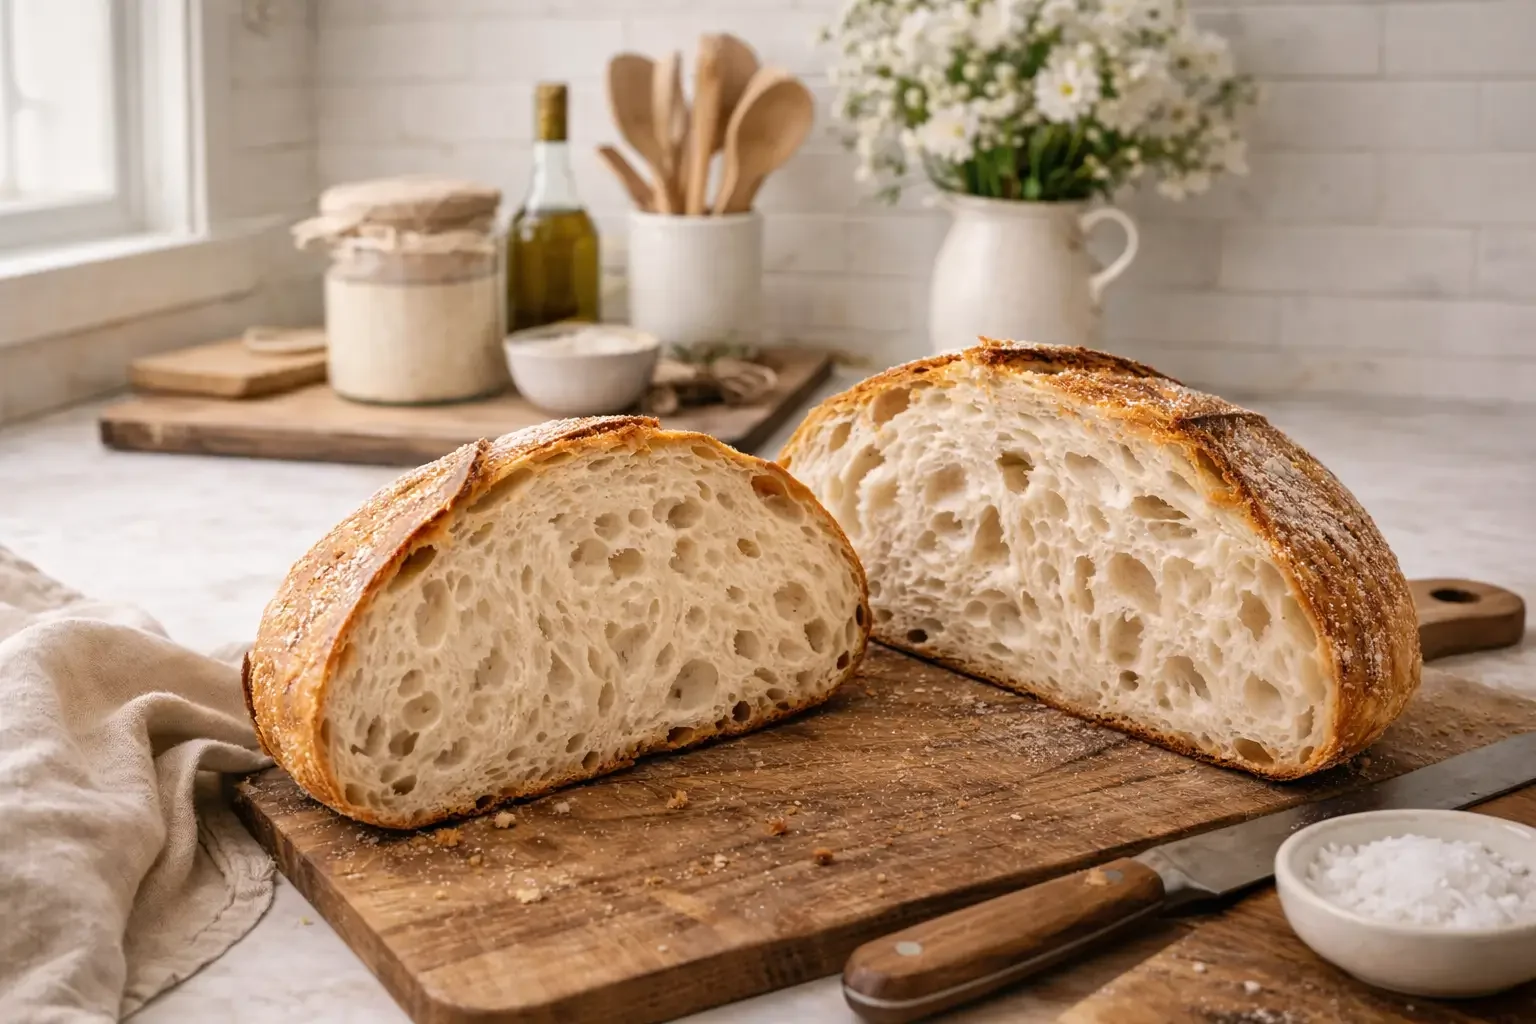
You’ll end up with a loaf that has a crisp crust, soft interior, and complex flavor. We keep it simple—grass-fed butter, a little salt, or homemade jam.
This is real food. Bread that took time. Bread that supports digestion instead of overwhelming it.
A Note on Nourishment Beyond Bread
If you’re focused on building meals around traditional, nutrient-dense foods, sourdough fits beautifully into that framework—but it shouldn’t stand alone.
We’re big believers in pairing carbohydrate sources with high-quality protein, minerals, and fats. That’s why we often include things like bone broth-based protein or organ-rich foods alongside meals like this. These combinations help stabilize blood sugar and support overall metabolism.
If you’re already thinking this way, you know that how foods are prepared matters just as much as the foods themselves.
If you want recipes you can make with sourdough, check out all of our recipes here.
“There’s no single ‘perfect’ fermentation time. The best sourdough is the one that tastes good, digests well, and fits your body — and that takes experimentation.”
Final Thoughts
Sourdough doesn’t have to be complicated. When you understand the why behind each step, it becomes intuitive—and honestly, kind of therapeutic.
If this is your first loaf, don’t aim for perfection. Aim for consistency. Each bake teaches you something, and over time you’ll find the timing and fermentation length that works best for your body.
And once you do, it’s hard to go back.
If you want to see the entire process from start to finish, make sure to watch the video above—and if you’re building a kitchen around traditional cooking, this is one skill worth mastering.

