How to Make a Sourdough Starter (Beginner-Friendly, Science-Backed, and Easy to Follow)
Beginner-friendly fermentation guide
How to Make a Sourdough Starter (Step-by-Step)
A practical, science-backed guide to traditional sourdough — why fermentation matters, what makes real sourdough different from modern bread, and an easy 5-day starter method you can follow for the very first time.

Author
Craig McCloskey
Certified Nutritionist
Sourdough isn’t a wellness trend. It’s a return to what bread always used to be.
For most of human history, bread wasn’t something engineered to last two weeks in a plastic bag. It wasn’t “enriched” flour whipped up with commercial yeast, dough conditioners, preservatives, and a long ingredient list. Bread was a living, fermented food—made slowly, with time doing most of the work.
That’s why sourdough matters. Not because it’s cute on Instagram, but because it’s one of the simplest ways to prepare grains in a way humans have relied on for thousands of years.
And if you’ve ever felt like “bread doesn’t love me back”—bloating, heavy digestion, skin flare-ups, brain fog, blood sugar spikes—this is where sourdough often changes the conversation. Not because sourdough is magic, but because fermentation makes the grain much easier to digest.
“Sourdough isn’t a health trend — it’s the original way humans prepared grains to make them more digestible and metabolically appropriate.”
What sourdough actually is
Sourdough is a fermentation system. A true sourdough culture is made from two things: flour and water. Over time, it becomes home to wild yeast and lactic acid bacteria. Those microbes feed on carbohydrates in the flour, produce organic acids and gases, and transform the dough in ways that fast bread-making simply doesn’t.
That transformation matters for three big reasons:
Now, a quick but important note: sourdough is not automatically “gluten-free,” and it is not entirely considered safe for celiac disease unless it’s a very specific, controlled process designed to extensively degrade gluten.
So if you’re celiac, treat gluten like gluten. But if you’re simply someone who feels better with traditionally prepared foods, sourdough can be a game changer.
“The problem with modern bread isn’t wheat itself — it’s skipping the fermentation step that humans relied on for thousands of years.”
Why store-bought “sourdough” often fails people
Here’s the frustrating part: many loaves labeled “sourdough” in grocery stores aren’t truly long-fermented. A common shortcut is adding acids—lactic acid, citric acid, vinegar, “sourdough flavor”—to mimic the tang without the time.
That loaf might taste sour, but it didn’t go through the same fermentation process that changes digestibility, phytate breakdown, and FODMAP content. Unfortunately, many of these storebought breads behave much more like standard bread.
The simplest way to tell if it’s truly long-fermented sourdough is ingredient simplicity. Traditional sourdough is essentially flour, water, and salt—plus the living culture that does the fermenting. And that’s all you need to make the real deal right in your own kitchen.
The biggest beginner mistake: thinking sourdough is complicated
Sourdough can get complicated if you want it to. But getting started is not complicated. You’re not baking a perfect artisan boule today. You’re simply building a culture—like a tiny ecosystem you feed daily.
Once you understand that, the whole thing becomes simpler:
You feed it. It ferments. It gets stronger. It rises reliably. Then you bake.
And when life gets busy, you can refrigerate it and slow everything down.
“Humans don’t ferment grains well internally, which is why traditional cultures fermented them before eating.”
One more science piece, in plain English
If you want the “why” in one line, it’s this: fermentation is a form of pre-digestion.
I talked about this more in depth with best-selling author Dr. Bill Schindler in my recent interview with him. Check it out here!
Watch the full Step-By-Step video
Read the video transcript
[0:00] Your sourdough journey starts here.
[0:02] Today, I'm going to talk to you about all the ins and outs of how to begin your sourdough process.
[0:05] We're going to start making our sourdough starter.
[0:09] I'm going to talk about what this is, how easy it can be to make sourdough, and if I do my job right today, you're going to want to start making sourdough right away.
[0:17] So, before I begin showing you how to actually make your starter, I want to talk a little bit about what sourdough is, the benefits of it, and why you should start thinking about consuming it.
[0:28] But if you don't want to listen to that, you can just skip to the part where I talk about the tools you'll need and actually how to create your sourdough starter.
[0:32] So, what actually is sourdough?
[0:34] If you've been on social media and you've seen people posting about them making homemade bread and sourdough, you might think that this is just a current trend or fad in today's world.
[0:44] But in all actuality, whenever you've heard about bread in ancient history, within the past few hundred years or few thousand years, this is how bread has always been made.
[0:53] If you've heard about bread in the Bible, this is the bread that they are talking about.
[0:58] But all the bread in today's grocery stores aren't really bread. I even hesitate to call them bread.
[1:02] White bread, even the wheat, whole wheat bread, even the sourdough bread in the grocery store, as I'm about to talk about, these aren't true breads.
[1:11] They last forever on the shelves. They're full of preservatives and other artificial ingredients, a long list of ingredients, and these just really aren't bread.
[1:18] But why would you want to consume sourdough in the first place? Why would you want to go through this entire process?
[1:24] Because this is a way that you can actually enjoy bread again and receive health benefits from it and not experience autoimmunity or digestive issues or sudden insulin spikes or skin issues or digestive issues when you consume grains.
[1:38] This is a way that you can consume bread again and feel good.
[1:41] Ancient cultures, humans have known for a long time since we started the agricultural revolution about 10,000 years ago.
[1:50] Humans knew then that you couldn't just go up and start consuming grains without properly preparing them first.
[1:53] Whether that is soaking or sprouting or fermenting because this helps to reduce the defense chemicals in those grains.
[2:00] Now all plants whether that is leaves, stems, roots, nuts and seeds, these all contain any varying degrees of defense chemicals.
[2:07] One of the most popular defense chemicals is gluten.
[2:11] This is a lectin that has been shown in the data to cause a level of autoimmunity.
[2:17] It causes leaky gut. It can cause skin issues and in severe cases with individuals who are celiac can cause even death.
[2:27] But when you learn how to make truly long fermented sourdough like we're going to do today, the fermentation of these grains removes a lot of that gluten among other anti-nutrients.
[2:36] And this is what humans have been doing for thousands of years.
[2:41] We've just forgotten it or kind of pushed it to the side in our western culture.
[2:53] Fermentation, soaking, and sprouting are what humans have always done to properly prepare their plants and their grains.
[3:00] But for the sake of just hitting their bottom line, it's more cost effective to not long ferment your sourdough.
[3:12] It's more cost effective to just use refined grains and put a long list of ingredients in there.
[3:16] Our digestive tracts aren't designed to break down and ferment grains like other species might.
[3:23] Just for example, ruminant animals like cows and bison, they have four stomachs.
[3:33] This stomach is literally designed to ferment the grasses that they eat.
[3:44] Human digestive tracts on the other hand, we have one long esophagus into very acidic stomachs.
[3:50] Then we have a long small intestine and a short colon.
[3:52] This digestive tract is really good for breaking down animal proteins.
[3:56] We don't have the type of digestive tract that is designed to ferment the grains internally.
[4:01] What humans have done throughout a very long time is we've evolved to ferment our foods externally.
[4:08] Remember that when people talk about grains being healthy, there's context.
[4:12] In today's modern world, the way we consume grains is completely different than how we've always consumed grains.
[4:19] The way humans have consumed grains throughout all of history, it's always been fermented, soaked, or sprouted, or prepared another traditional way.
[4:23] So that way these defense chemicals can be limited and we can actually digest and absorb the nutrients found in those grains.
[4:32] Today we just often consume grains every day without them going through the proper preparation methods.
[4:37] So if you're new to your sourdough journey and you love consuming grains like I do, this can really be that thing that helps you to be able to enjoy grains in a healthful way.
[4:47] But you might be thinking, Craig, what about sourdough from the grocery store?
[4:54] Well, if you look on the back of a sourdough label and you see any type of ingredients that say acid in it, lactic acid or citric acid or some other form of acid, that is an ingredient that companies use to bypass the fermentation process.
[5:07] You might as well just be consuming white bread, wonderbread at that point because that's the same thing nutritionally.
[5:13] Truly long fermented sourdough should only have three ingredients: water, flour, and salt.
[5:21] And of course bacteria and yeast, but that's going to come when we ferment this.
[5:25] Bacteria and yeast are going to be created from this living culture that we're about to create.
[5:29] So, you're new to your sourdough journey and you want to begin making your sourdough.
[5:34] Well, it starts here by creating your sourdough starter.
[5:41] Some people have had their starter passed down generations.
[5:47] It's a living organism that as long as you feed it right with water and flour, that bacteria continue to feed off itself.
[5:54] This is very good bacteria that's going to populate your gut microbiome, that's going to help to reduce all the defense chemicals in grains like the gluten and other lectins and anti-nutrients found in grains.
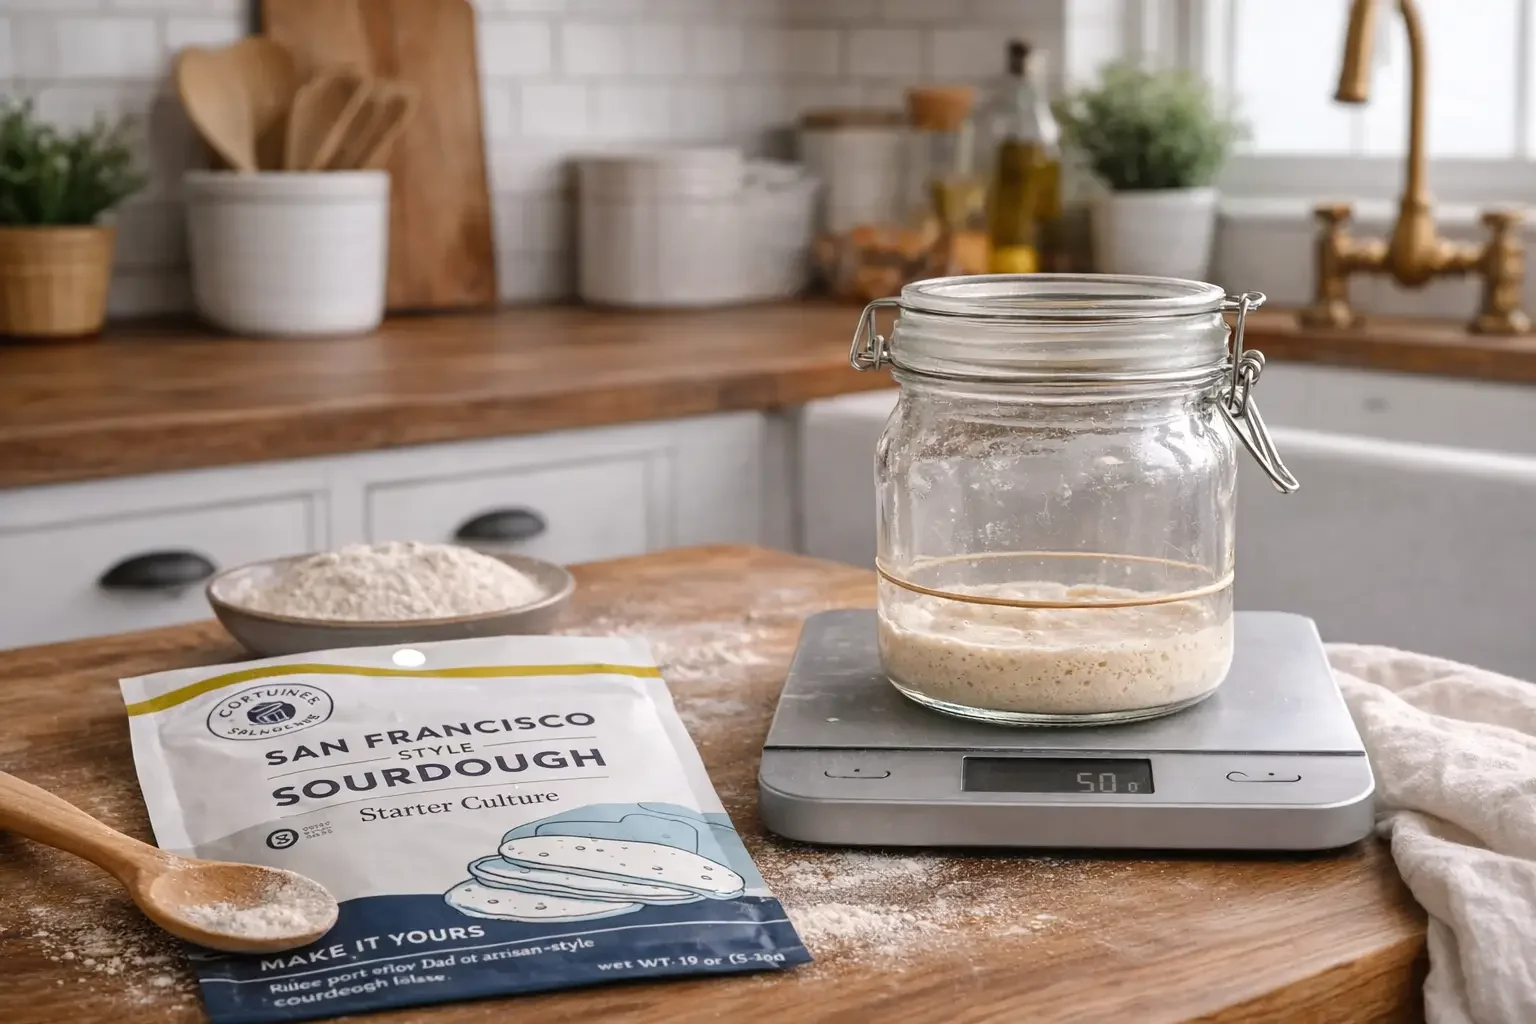
[6:08] And so here are the tools that you're going to need when you begin making your sourdough starter. So take notes.
[6:15] The first thing you're going to need are two glass mason jars. Make sure they're glass.
[6:18] A rubber band can also come in handy.
[6:28] You're also going to need a kitchen scale.
[6:32] You're going to need a nice wooden stir to mix up your flour and water.
[6:37] And then filtered water. Make sure that your water is actually filtered because if you're just using tap water, the chlorine in there can actually kill the bacteria.
[6:47] I'm using reverse osmosis water with no minerals added in it.
[6:50] You're also going to need an organic, unbleached, all-purpose or bread flour.
[6:59] I've wanted to start playing around with einkorn, which is an ancient grain.
[7:08] But if you're become more experienced, then you can definitely play around with an ancient grain like einkorn.
[7:14] And the last thing you're going to need, this is super super important… You're going to need a dehydrated sourdough starter culture.
[7:25] What we've used in the past, this is from Ballerina Farm. This is called Willa.
[7:34] This is just simply a starter that we're going to make today that's just been dehydrated into flakes.
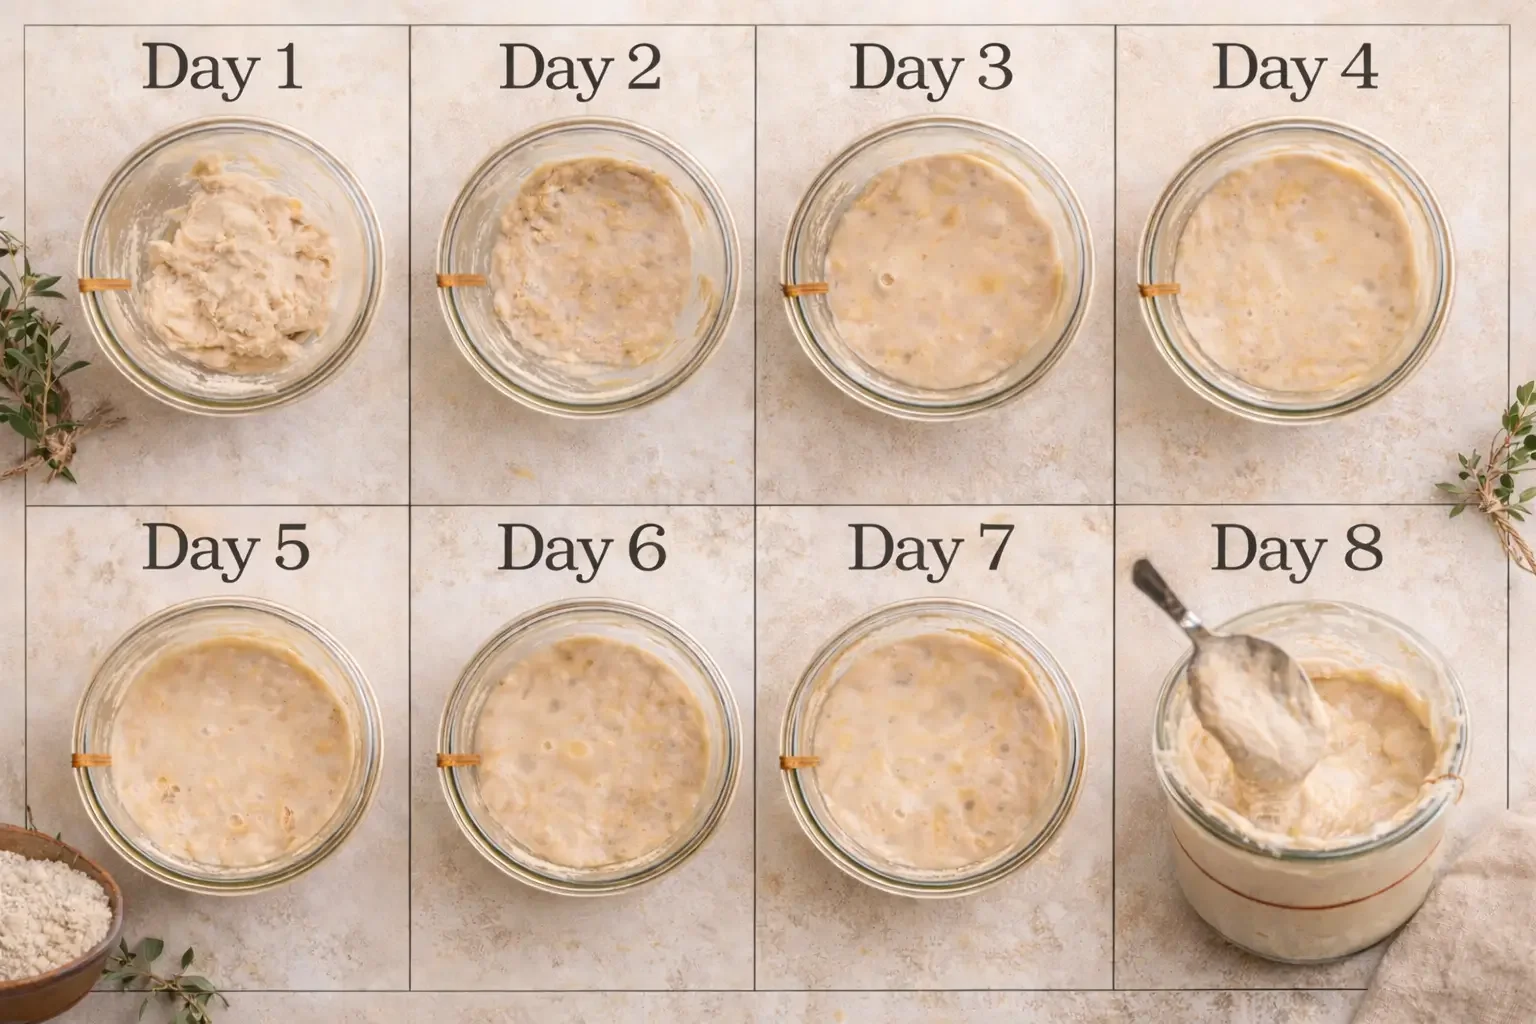
[7:45] This is going to take about 5 days for it to become fully alive and active. Then you can start baking with it.
[7:55] It just requires a little bit every day, maybe just 2 to 5 minutes every single day.
[8:08] If you're not feeding your sourdough starter every day, you can just stick it in the fridge and it stays alive a lot longer.
[8:13] If you're traveling… Absolutely. We do all the time. We just stick it in our fridge and it stays alive.
[8:23] So to start your sourdough starter, this is morning one.
[8:29] Place your jar on the scale and tare it to zero.
[8:34] Add 5 g of sourdough starter culture.
[8:43] Tare again and add 25 g of water.
[8:47] Let it sit for a minute so the starter absorbs the water.
[8:54] Tare again and add 20 g of flour.
[9:07] We’re doing a little less flour than water the first time because extra water will allow it to really ferment overnight.
[9:15] For the rest of our feedings, we’re going to use equal parts water and equal parts flour.
[9:19] Mix evenly so there’s no dry flour left.
[9:32] You should see a toothpaste-like consistency.
[9:42] Place a lid on it and sit it at room temperature. I prefer to store mine in my pantry.
[9:54] Then on day two, you’re going to come back and we’re going to feed it again.
[10:00] It’s been 24 hours… it looks the same. No bubbles. It hasn’t risen.
[10:10] Place a new clean jar on your scale and tare it.
[10:15] Take 10 g out and add this to your new clean mason jar.
[10:26] You’ll notice you’ll have discard… and when it’s alive and active, this can make really good pancakes or waffles.
[10:53] Add equal parts water and flour: 25 g flour and 25 g water.
[11:03] Mix it up and it should be about the same consistency.
[11:15] You can place your rubber band on it now, but I don’t expect this to grow very much yet.
[11:21] Days four and five is when you’ll want the rubber band to really track growth.
[11:47] Morning 3: do the same exact thing as morning 2.
[11:53] Morning 4: do the same exact thing. Take 10 g out and add 25 g flour and 25 g water.
[12:00] Add a rubber band at the top of where your starter currently is to track rising.
[12:15] Evening of day four… you’ll probably notice bubbles and it’s risen slightly.
[12:31] If you’re doing this right, you should see some bubbles and it’s risen.
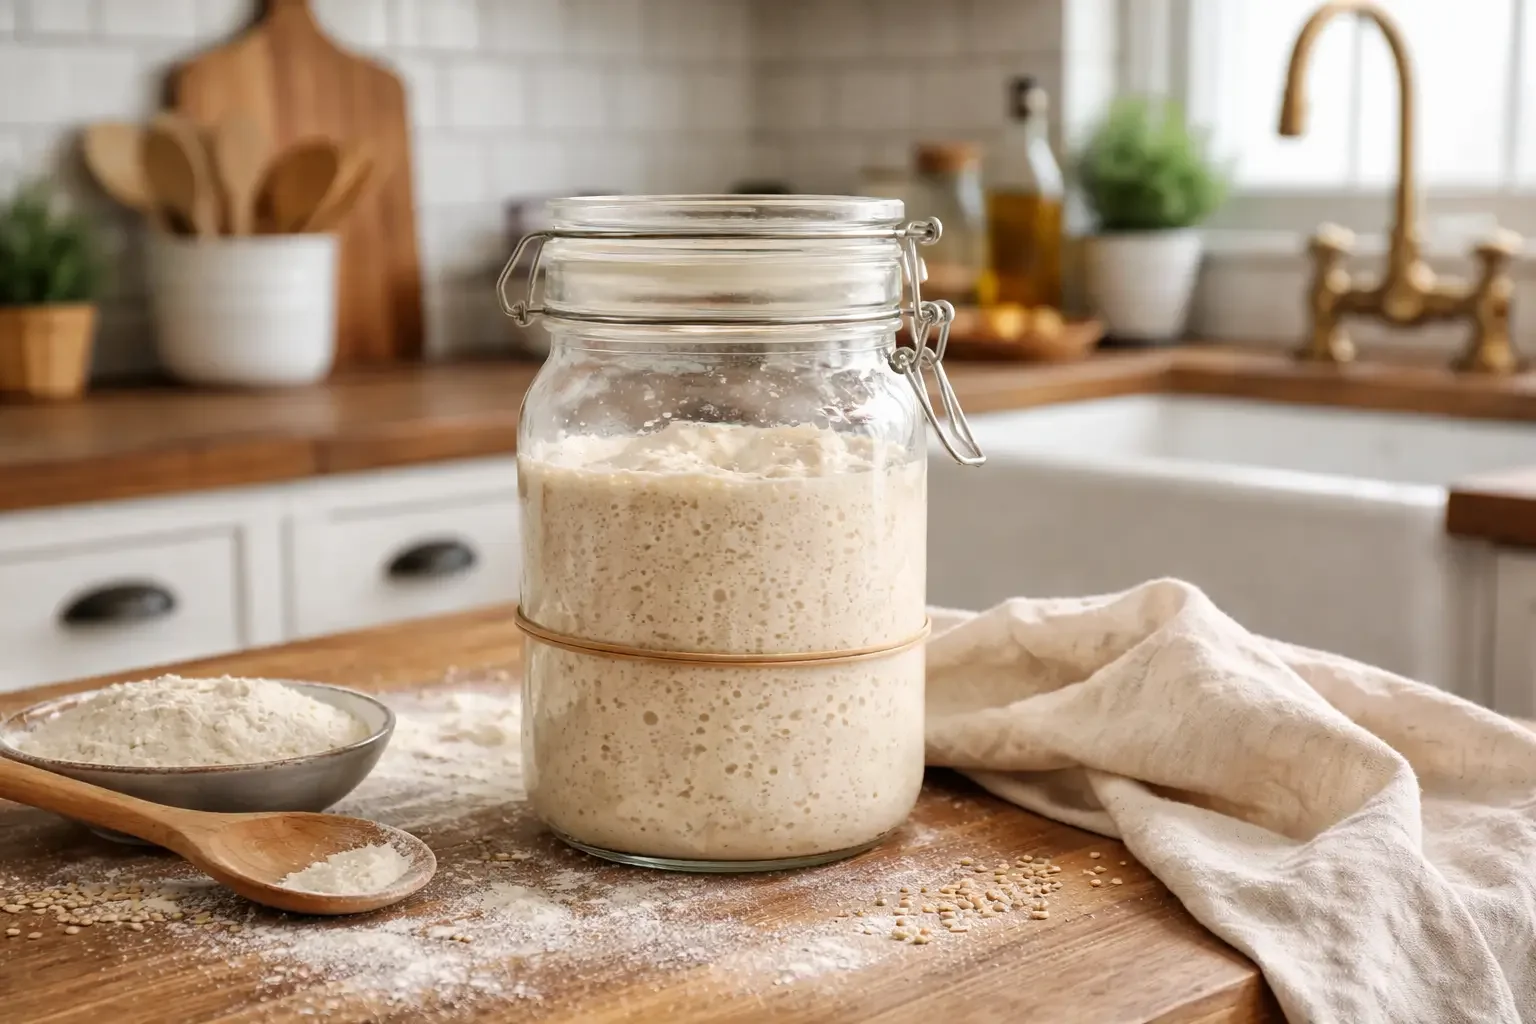
[12:37] Day five: if it looks like this, that’s when you know your starter is alive — congratulations, you can start baking with it.
[12:56] You’re going to want to feed this every day unless you stick it in the fridge.
[13:07] If you’re using it regularly, keep it out on the counter.
[13:22] When we feed this daily… we’ll take it down to about 500 g then add 100 g water and 100 g flour.
[13:49] You can really start to see bubbles forming. That’s when you know it’s alive.
[13:56] If you feed this right and keep it alive, this is something you can pass down generation to generation.
[14:03] Some starters have been going for decades. Ours is about 3 years old.
“A sourdough starter isn’t just a baking tool — it’s a living ecosystem that does the digestive work for you.”
Sourdough Starter for Beginners: The 5-Day Step-by-Step
This method is designed for the person who has never done this before. It’s simple, repeatable, and forgiving.
What you’ll need (keep it simple, but do it right)
Sourdough Starter Checklist (Before You Begin)
Getting these basics right makes sourdough dramatically easier — and helps prevent common beginner mistakes.
Day 1: Build the base (Morning 1)
Start with one clean mason jar.
Place it on your scale and tare to zero. Add 5g dehydrated starter culture (here is the one we recommended) to the jar. Tare again and add 25g filtered water. Let it sit for about a minute so the culture hydrates and softens. Then tare again and add 20g flour.
Stir it until it’s fully mixed with no dry pockets. You’re looking for a thick, toothpaste-like consistency. Not watery, not crumbly.
Put the lid on loosely (you don’t need to seal it like you’re storing soup), then set it somewhere room temperature and out of direct sunlight. A pantry is perfect.
What to expect today: not much. No rise is normal. No bubbles is normal. You’re laying groundwork.
Day 2: First feeding (Morning 2)
After 24 hours, your starter may look basically the same. That’s okay.
Today you’re going to “refresh” it. Put a clean jar on your scale and tare. Scoop 10g of your Day 1 starter into the clean jar. You’ll have extra left behind—don’t stress about discard yet. Early discard usually isn’t worth saving until the starter is active and smells pleasant.
Now tare the scale again and add 25g water. Tare again and add 25g flour.
Mix until smooth, lid loosely on, and back to room temperature.
What to expect today: still may look inactive. You’re building microbial strength.
“Early off-smells, no bubbles, and zero rise are normal — you’re building the foundation before anything visible happens.”
Day 3: Repeat (Morning 3)
Day 3 is the same rhythm as Day 2.
Transfer 10g starter into a clean jar, then add 25g water and 25g flour, mix well, cover loosely, and store room temp.
If you want, add a rubber band around the jar at the starter’s current height. This makes it easy to see rising over the next couple days.
Day 4: Repeat and watch for activity (Morning 4 + evening check)
Same feeding again: 10g starter into a clean jar, then 25g water and 25g flour.
By late Day 4, many starters begin showing signs of life. You may see bubbles on the sides of the jar. You may notice a slightly tangy aroma. You may see a small rise.
This is the culture waking up. The microbes are feeding on the flour and producing gases.
If your kitchen is cold, everything may be slower. If it’s warm, you may see more activity. There’s a range of normal here.
Photo placeholder: Close-up of bubbles forming on Day 4.
“When sourdough is done right, bread becomes something you can enjoy again — not something your body has to fight.”
Day 5: You’re looking for reliable rise (Morning 5)
Feed the same way again: 10g starter, 25g water, 25g flour.
A starter is generally considered “ready” when it rises predictably after feeding—often doubling in volume within a few hours depending on temperature and flour choice. You’ll see bubbles throughout, and the texture becomes airy and elastic rather than pasty.
If Day 5 arrives and you’re not there yet, don’t panic. Some starters take a couple extra days, especially in cooler homes. Keep feeding daily until the rise becomes consistent.
Keep going it may take you a full week to see the full difference.
SHOP OUR SOURDOUGH ESSENTIALS
Everything We Use — In One Place
Shop the exact products we use to make a perfect sourdough starter.
 Weck Jar
Starter Jar
The glass Weck jars we use to keep our sourdough starter in.
Shop Amazon → Sourdough Stick
Wood Spurtle
Perfect for scraping the sides and mixing your starter.
Shop Amazon → Starter
Dehydrated Starter
Makes beginning your sourdough journey effortless.
Shop Amazon → Scale
Scale
Kitchen Scale
Essential tool for getting portions exact.
Shop Amazon → All-Purpose Flour
King Arthur Flour
Organic, unbleached all-purpose flour.
Shop Amazon → Water
Water
AquaTru Reverse Osmosis Filter
For perfectly filtered water, every time.
Shop AquaTru →How to keep your starter alive (without it taking over your life)
Once it’s active, you have two options: keep it at room temperature and feed daily, or keep it in the fridge and feed weekly-ish.
If you bake often, room temp is convenient. If you bake occasionally, refrigeration is your friend.
Here’s the simple version: cold slows fermentation. Warm speeds it up. Your starter will match your lifestyle.
When you’re feeding regularly and keeping a larger starter, many people maintain it by discarding down to a baseline amount and then feeding equal parts flour and water by weight. The exact quantities can scale up or down—what matters most is consistency.